Showing posts with label guest. Show all posts

Monday, March 11, 2013

Day 197

So much has happened over the past few weeks that I don't even know where to begin!
 
It took them nearly 3 days, but the majority of the kitchen cabinets are installed. I am so so so excited about them. I kept telling Ben that it was like Christmas, but better : ) As you can see in the first picture, there is a big spot where we are missing some. They accidentally ordered the hood in white, versus soft white, so they had to re-order. Eventually there will be a range hood and cabinet to the right of it. I chose to do the perimeter of the room in a soft white cabinet and the island in a darker wood. They will install the hardware in a few weeks when they come back to put the range hood up. I think it will make a big difference in the way it looks! We also went this weekend and picked out our granite slabs, they are hoping to install them on Friday.
 
 
The missing appliance on the left wall is the dishwasher. To the right of the dishwasher is the farm sink, probably one of my favorite things in the entire house. I didn't take a great up close picture, but you can see it if you look closely.
 
This wall will have the double ovens (they will cut the existing hole that you see to fit them) and refrigerator. The upper cabinets in the middle section will be open with a clear glass pane.
 
They also got started on the laundry room cabinets. The big hole you see will be the washer and dryer. I chose to do front loaders so I could put a counter top over them for folding...thank you Pinterest!
 
My desk is under the window and will have cabinets and bookcases built in the right corner. The bookcase will rest on the countertop so they will wait to install the remaining cabinets until the tops are in.  There will also be a sink and hanging bar, but they are not installed yet.
 
My brother in law has been busy working at the house to get the tile put down. We decided to do a heated floor in both the hall bath and master. They are inexpensive to do and will make a big difference. Both of these bathrooms are above the crawl space, so it would be super chilly during the winter. You can see the heating coils in the picture below.

We went with a white subway tile in the hall bath, i wanted to keep things fairly neutral and add color with fabrics and paint. The bathtub is original to the house but we will re-glaze it. For the floor, we chose a light blue penny tile (small circles). They are finishing up grouting this bathroom today and I will hopefully have pictures of it finished soon! 
 
 
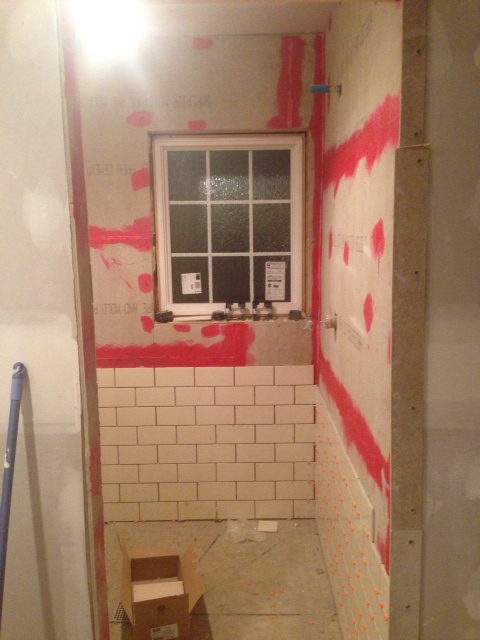
We also chose a subway tile for the master bath. It is a cream color with a crackle finish. I don't know if you can tell from the picture, but it is a larger tile than we used in the hall bath.


Just to give a little perspective, the window you see in the shower is the one that is above the toilet below. We replaced the window with a patterned glass (you cant even really tell in the picture) so you couldn't see in from the outside. One of these days I am going to draw out the old and new floor plans, they really are completely different!
 
 The guest room that is right off the kitchen has a full bath attached to it, that will also serve as the mud room. Because it will be such a high traffic room, we decided to put tile down versus hardwood. They finished it up last week.
 

I did want to share 2 things just to keep things real. Not everything has gone super smoothly. For example, look how nice our garage door looks...
 Haha! Ben and I stopped by the house one night and this happened. We got in the truck to leave and when he pushed the garage door button, something went really wrong. We still don't completely know what happened. The glass didn't break when it initially came off the track. It broke a few days later when someone was trying to lift the door. In the end we will have to get a new door. I can't say I am sad, I have wanted a new door from the start, but it just didn't make any sense to buy one. The old owners replaced the door last summer and we just didn't need to spend the money. Hopefully the weather is starting to warm up and they will re pour the concrete on the garage floor. Once they do that, we will have a new door fitted.
 
I also have to tell on myself....Apparently the front door works with 2 separate keys. The deadbolt is one key and the knob is another. Ben swears he told me that, but I honesty do not remember hearing it. It makes no sense to me! I went over to meet his family Saturday morning and when I left, I locked the deadbolt and the knob, whoops. We went over later that night to meet friends and he realized what I had done. We only have the key for the deadbolt so we were out of luck. He decided we would just go around back and use the back door. Which sounded like a great idea, until he realized that I had locked the storm door ;-) I kept reminding Ben about how much he loves me, ha! He ended up taking a block and busting out the back storm door. We were going to take it off anyways, so it wasn't a big deal, just an annoyance. I can promise that I will never make that mistake again!

 
And last, but certainly not least, look what got delivered today...
 
WINDOWS! Hopefully they will be in by the end of the week.


Tuesday, February 19, 2013

Day 177

The drywall has been completely finished up! There wasn't really much to blog about while they were finishing up. I don't think pictures of drywall mud, sanding and dust would be very fun to see : )

Here are some of the rooms finished up. Its really starting to look like a house versus a construction site now.

Small guest room off the kitchen...affectionately known as Aunt Anne's room

View from guest room to kitchen
 View from other side of kitchen. The breakfast table will be in front of that large window and the room you see to the left is the guest room.
 This is the ceiling in the living room where the 2 large sky lights used to be. Its crazy to me that you can't even tell where they were. They did a really good job.
 
 
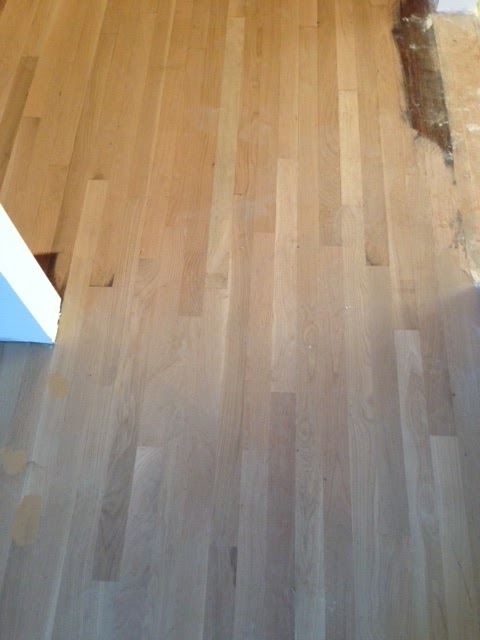
They have also been working on the hardwood floors over the past week. If you remember back a little bit, I mentioned that they would be sanding down all of the old floors before they put new stain on. This will make the old wood and new wood look the same. I am shocked at how good it looks. I really thought you would be able to tell where the old ended and the new begins. Here is a good example, the next 2 pictures are at the same spot on the floor and you really cannot tell the difference between old and new.
 

 This is the hallway where the bedrooms are, the sides have been sanded and the old stain is still in the center.
Living room edge still needing to be done but main floor complete
 
After the floors were completely sanded they put 3 different shades of stain down for us to look at. This picture makes it hard to tell the difference, but the lightest is on the bottom and darkest is on the top. We both agreed to go with the top color. It was the darkest option but not too dark. They are going to start putting the stain down this week. We will have to stay out for a few days while it dries.
 
One last thing...a few weeks ago I mentioned that they finished putting all new gutters on but I didn't have a picture. I took this on my way into the house the other day and thought I would post it.


Tuesday, October 2, 2012

Day 37

Demo continues at the house...I always stop by the house after work to see what has been done and almost always walk in to a wall being ripped out, tile being pulled up or ceiling coming down. It is fun to see the progress!
 
There is an office off of the kitchen that we are turning into a guest room. The other side of the house currently has 4 bedrooms, but we are removing one of them to expand the master bath and put in a laundry room. I really didn't want to lose that bedroom, so we are converting the old office to a guest suite. It has a half bath off of it right now that we will be turning it into a full bath. It will be the perfect place for guests because it is in its own area, away from the other bedrooms. We have affectionately called it "Aunt Anns" room for Bens Aunt :) 
 
The walls in that room were covered with a grass cloth that looked horrible. I keep saying it looked like they had a cat locked in the room and it clawed the walls. This picture doesn't do it justice, but it was so stringy and half was torn off. When we started to think about ripping it off, we realized it would likely just take off pieces of the drywall with it, so we decided to just go ahead and take out the drywall. In the end, it would be more expensive to patch and repair what was there versus putting up brand new.


This is the view from inside the bedroom, into the half bath. Like I mentioned, this will end up being a full bath when we are done. Its not huge, but perfect for a guest.
 
This is a view from inside the bedroom.The door is looking out into the breakfast area. Just as a side note, these before pictures were taken right before we closed, so you are seeing the previous owners things. If I were to take this picture again, you would look out and see the wall studs because the entire kitchen has been taken out.
 
This is after the drywall was removed. The room you see on the right is the current half bath. I was standing in the doorway when I took this. One other thing, if you look on the right hand wall, you will see a white box. This is where the old washer and dryer hookup was (on the other side of the wall). We are removing those and putting the laundry on the other side of the house, but we will use the existing water lines to put in a shower for the guest bath.
 
 Another view from the doorway
 
 
The other BIG project that we have gotten started is removing wallpaper. Mom and I started work on the former dining room on Sunday. The old dining room will end up being Ben's office. The room has at least 3 layers and it appears that the first layer was put directly on the drywall, with no primer. Ay yi yi! I am really wishing it was in the budget to rip out all the paper and just put up new drywall. We worked all afternoon and didn't even get half of one wall done.

 
This is mom when we first got started. I forgot to take a picture of what we got done, but you aren't missing much. We were able to get down to the last layer but it doesn't look like we can get it off without ruining the drywall, so we may just have to pain over the one layer. Wallpaper is now a dirty word in my vocabulary!